Monday, December 1, 2014

4-knots or 2-knots?

Firstly an overview.

You can string a racquet using a single 10m string with 2-knots, or, with 2x5m lengths and secure these 2 strings with 4-knots - see examples below.


4-knots with equal tension of horizontal and vertical string
2-knot with equal tension throughout

INFO - If you strung a racquet and then remove the string used, it will measure 8.3-8.5m.

Browsing the internet for stringing patterns, you will notice different manufacturers show pictures of either 4-knot or 2-knot patterns.

In addition, there are references for the horizontal tension to be +1/2lbs higher than the vertical when doing 4-knots.

And talking to friend(s) overseas, there seem to be regional preference(s) eg 4-knots for Down Under (Australia, NZ), around 50/50 in ASEAN nations, etc.

Thus it looks like there is no clear dominance of either 2/4-knots, either than regional influences (at this point of time).

Personally, I prefer the feedback from racquets strung using 2-knots as a single string is used thru-out the frame which permits the tension to be spread out more evenly (especially after a few hits). It's alike the bi-wiring in HIFI e.g if you check the internals of an amplifier the 2 pairs of terminals are fed from the same source, and, HIFI designers say they provided the facility due to consumer demand not because it truly provide advantages.

Similarly I do the same tension on both vertical and horizontal lines when doing 4-knots - everyone who has tried my 4-knot hybrid stringing have provided good feedback so far.


Saturday, November 1, 2014

"Waxing" of strings

Was extremely surprised when I received a request (from a chap age about 40) for a waxing treatment on the strings after I had restrung his racquet!

Why?

The practice used to be common long ago when strings were made from natural gut. In those days the racquets were made from wood. A layer of wax was normally applied to the strings before and after usage, to protect the strings from wear&tear (via friction) as well as from water.

I obliged and applied a layer of wax on (both sides) the strings after restringing with Yonex BG66 Ultimax @ 26lbs.

Pix of the result as per attached below.
Yonex Z-Force 2 after waxing the strings on both sides


Wednesday, October 1, 2014

Flying clamps

Not sure what the concerns are regarding stringing badminton racquets using flying clamps. Been doing so myself for over a decade.

The following are some examples of the flying clamps available in the market today.

Example - Yonex aluminium clamp
Example - Gamma composite clamp
Example - Generic floating clamp

I believe the concerns apply more to stringing tennis (or above 33lbs for squash) racquets, as the tensions in-use are much higher.

Suggest the following if you want to be sure your flying clamps are adequate for the tension you are stringing at.

- Take note when you are clamping near any logo or print on the string. If the area of the string with the logo slips a lot after you release the tensioner, your clamps are inadequate for the tension inuse
     - Work around (till you can obtain replacements) is to use 2 such clamps in-series

- If you retry the tensioner after securing a string and the tensioner does moves quite a bit... OOPS
    - Work around as per before

- Purchase a tension meter - an analogue unit will do. For verification purposes after completion


There's even a YOUTUBE of someone stringing a Panda badminton racquet at 40lbs tension using 2 flying clamps in-series without issues.

Monday, September 1, 2014

"Smart drop weight" vs Electronic tensioning


A couple months after the Stringway ML-100 purchase, I came across an article on BadmintonCentral regarding resulting tension.

The following is a CUT&PASTE from the PDF in one of those discussions.


My clients feedback the tensioning is consistent across the stringbed. Maybe there is something to the graphs after all.

Gravity (in a proprietary drop weight design) vs electronic motor controlled by a programmed firmware ...

Friday, August 1, 2014

Stringway ML-100


Please note the Stringway is designed differently than the standard drop weights and/or the drop weights with a ratchet mechanism. Hence it is not impacted by those issues.


The Stringway ML-100  is my 2nd and current stringing machine.

The ML-100 could be use as a portable unit, and/or, as a standard mounted stringing machine with the optional stand.


All stringing tools are not included unless you wish to purchase the Stringway clamps for non-badminton stringing ,or, substitutes clamps for badminton (Yonex).

I am using floating clamps vs those attached to the machine. Purchased the Yonex and Gamma clamps for badminton string.

An optional badminton racquet mounting kit is required for the machine - red coloured items in following pix


I am a customer and no way affiliated with Stringway in any commercial manner

I purchased the machine in 3Q2013 (with the optional stand) as the local stringing service was getting expensive with inconsistent quality eg you know the difference upon the first few hits.

Checking the internet, noticed there were now many choices of low cost electronic stringing machines compared to over 10 years ago. Was very tempted to buy a low cost model with a electronic tensioner ... VERY VERY tempted!

Nevertheless I decided against the low cost machine with a electronic tensioner at the 11th hour and ordered the Stringway instead.

Reason?

I required a machine which could provide a consistent result across the stringbed, simple to operate, reliable, and had to be maintenance free for years. Read many good reviews/feedback for the Stringway. In addition, my old flatmate in NZ had previously owned a Stringway and spoke volumes for their machines as well - nothing like word of mouth!!

Summary of my experience with the ML-100 to date:-

Pro(s):
My clients feedback the tension is quite consistent across the stringbed and the results provide nice feedback upon usage
Independent of power supply or electronic issues
Reliable and maintenance free after setup
Solid build quality which provides confidence during usage
Badminton mounting kit provides solid mounting of the racquet
Good ROI for high quality but low volume usage
Good support from factory for post sale enqueries 

Con(s):
Structure holding the racquet could be located closer to the tensioner to lessen string usage (only applicable when using reels)
Tension settings not engraved onto tensioner bar - need to use special ruler provided to set the tension
Need to add your padding(s) to the grippers (some racquets nowadays uses decals instead of the real stuff to decorate the racquet frame)
Need to purchase your own tools eg awl, clamps, hex-keys, etc
Mounting kit required for stringing badminton racquets

Saturday, July 5, 2014

Post regarding tensions on the internet - feedback??? (***Updated***)

Came across the following post on the internet @ http://badminton-coach.co.uk/272/why-egos-and-incorrect-information-about-string-tensions-in-badminton-could-be-doing-more-harm-than-good/ and was referred to http://www.victorsport.com/coach_detail_7439.html?cid=475&utm_source=official+Social+Media&utm_medium=Facebook&utm_campaign=String+Poundage#.U9RsLFy0wOc.facebook by a friend.

Any one with feedback?

A coach once used the following analogy to explain why it was harder to hit a shuttle to the same distance vs using lower tension - imagine the stringbed like a trampoline, the tighter the trampoline, the harder you need to push it to reach the same height as per before.

The article mentions a smaller sweet spot with a higher tension, maybe that explains why we did not hear the "proper boom" much nowdays when a player hits the shuttle using a racquet strung at higher tensions?


Tuesday, July 1, 2014

Tension calibrator for the stringing machine

A tension calibrator is used to ensure your stringing machine is applying the correct tension when in-used.

There are 2 types of tension calibrators in the market - analog (aka "ruler"-type) scale and digital.

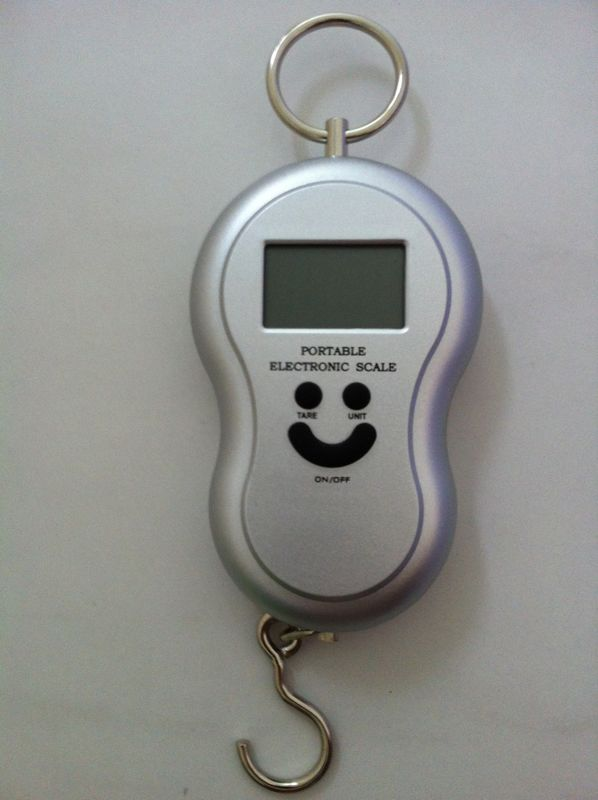
If you check online, you would discovered the analog tension devices cost a bomb! Hence I bought a digital tension calibrator instead. 

Please refer to my previous article to reference how a Japanese stringer used the device.

Do shop around before you buy as even the digital version (similar to the below) can be as expensive (USD$30 not inclusive of shipping)! I purchase my unit for about SGD$8 from eBay (inc shipping) and works like a charm. Yes, pretty cute as well!


Simple but functional.

Powered by 2xAAA batteries, it has a maximum capacity of 40lbs - more than adequate for my purposes (at current point in-time) as it is seldom for badminton racquets to be strung above 30lbs. Upon reaching a stable pulling tension (or weight), you will hear a beep and the information will be displayed either in kg or lb. Other functions include a HOLD and CLEAR/RESET and the ON/OFF button (aka "smile bar")

Sunday, June 1, 2014

Useful tool - Starting clamp

When I started stringing in 1989, the starting clamp was not available to the Joe Public.


It is a useful tool to have though not essential for stringing a racquet.

One example is best explained by the author at the following website.

I find it more useful as a finishing clamp rather than a starting clamp. I use it to tighten the knot rather than using a plier. Reason? It's less abrasive on the string than using a pair of pliers.

Please do note - never remove a starting clamp which is holding a tension-ed string as you can damage the area of the string held by the starting clamp eg break outer jacket of string.

Thursday, May 1, 2014

Summary of stringing patterns from internet - Haribito style (***Updated again***)

Sorry no translation but the pix(s) illustrates the methodology.

And apologies - I have removed past paragraph(s) as was confused with another stringing style whereby the sides was loop-back (not top&bottom) and tension-ed a few columns before the sides. Hear-say regarding racquets not lasting as long was with this just mentioned loop-back method which supposely provided better tenstions on the sides and was not Haribito. Personally I do not see the advantage of having better tensions at the sides as the goal or the ideal is to hit the shuttle within the sweet spot to provide optimum transfer of energy from the frame to the shuttle


Tuesday, April 1, 2014

Update - Useful tool to have - a string tension meter

Found the following simple device useful to determine the existing tension of a racquet (when in-doubt).


It is accurate to within +/- 1-2lbs. Hence it may not be fool-proof but does provide a more reliable reading compared to the previous guess-o-matic methodology!

True ... it can only measure up to a maximum of  42lbs but that is more than sufficient for determining the tension of a badminton stringbed at this point in time.

How do you use it?

Firstly center the device to zero before you start.


It has the following on the back of the device.

Place the 2 metal extensions to a cross-point as per in the above pix. The device will be at about a 45-degree angle in the North-East direction aka in the middle between 10-11 o'clock.

Then turn the dial clockwise until the meter shows noon or in-parallel to the string area to be measure - please see pix below.

Recommended places to perform the measurement are as shown below.

Hope the following vide0 explains better...


No more guess-so-matic !!!

Saturday, March 1, 2014

Sunday, February 2, 2014

Yonex stringing patterns


Please click the following link to be redirected to the Official Yonex website for stringing pattern(s) for their various racquet range(s).


Sunday, January 5, 2014

Old fashion "load spreader(s)"

You don't see these old fashion "load spreader(s)" utilise much nowadays as racquet technology has advance dramatically since the late 1970's.

"Old fashion" load-spreader at top of frame
"Old fashion" load-spreaders at bottom of frame
In the past, these load spreaders were essential to ensure the strings did not eat into the frame over time, when higher (at the time) tensions were utilised.

As per the pix(s), I am currently using them on my 2nd hand antique Yonex Carbonex 15 (with T-joint) from 1982. The specification on the racquet is maximum 18lbs but my racquet has been strung at 22lbs. Another friend with the same antique has his units strung at the same tension as well.

The load spreaders near the T-joint on 1-side (applied to both side for balancing) of the racquet conceal an area repaired using epoxy resin. This was because when I bought the racquet, a pair of grommets in that area had sunk halfway into the frame  (due to a crack between the pair of grommets). Superglue was then applied on top of the repair before it was repainted with a dash of black paint.

Balance impacted?

Everyone who wanted to try the antique from 1982 usually feedback the Carbonex 15 is a well balanced racquet!!!

Fragile?

Don't believe the chaps on the other side of the court agrees as I was using the racquet to smash them repeatly during a few games!

The load spreaders at the top of the frame were added as a precaution as this was a well known "cut thru" area for the T-joint Carbonex 15 - even when strung at low tensions.

Wednesday, January 1, 2014

TIP - Check racquet tension specifications before tensioning

Common sense right?

I normally hear of such unfortunate stories from newbie or inexperience stringers. The damage normally occurs at about 2/10 o'clock ... near the cross towards the top of the racquet frame eg breaks just when you are nearly done!!!

Hence please always verify the racquet's supported tension range before proceeding.

The main reason is because the tension calibrated on some stringing machines are raw values eg pulling a tension calibrator directly.

However on other machines, the tension could have been set higher than what has been marked to produce the desired tension within the racquet frame - refer to the Japanese author webpage.  Hence it is best to have a tension calibrator or digital fisherman's weighting scale handy to verify the tension produce by your machine for a given setting (after purchase).

In addition, the difference for a given tension within the racquet frame vs outside the racket frame has been demonstrated by a Japanese author on his webpage. Even though the Japanese author demonstrates with a tennis racquet, the difference applies to badminton racquets as well. Hence if the desired tension was close to the maximum and you had to add extra tension to compensate for your stringing machine - you risk damaging the racquet!

In all my years of stringing, I have not damage (... touch wood!!!) any racquet yet.